by Erik J. Schram -
Now, even if Microsoft didn't leave a ton of its customers hanging when they dropped support for XP, I still would have taken great pleasure in writing this article. I've been an Open-Source American for well over a decade now and just happen to help a lot of people with their technological problems, so every chance I get, I share the gift of Linux with the world. Best of all, between that embarrassment called Windows 8 and the price of a Mac, my argument could be easier to make. Also, if at any point you feel like stopping because its just not something you do, I can always do it for ya.
Now, even if Microsoft didn't leave a ton of its customers hanging when they dropped support for XP, I still would have taken great pleasure in writing this article. I've been an Open-Source American for well over a decade now and just happen to help a lot of people with their technological problems, so every chance I get, I share the gift of Linux with the world. Best of all, between that embarrassment called Windows 8 and the price of a Mac, my argument could be easier to make. Also, if at any point you feel like stopping because its just not something you do, I can always do it for ya.
I Know What They Say... But Don't You Listen
Contrary to popular belief, starting out in the world of Linux isn't that hard at all and you DO NOT need to be a "nerd" to use it. Like I said, I started over ten years ago and things were a tad bit different then. But when I introduce normal, everyday computer users to it for the first time, I tend to start with the same basics.
- I will repeat, YOU DO NOT have to be a genius to use Linux!
- Linux is an operating system just like Windows XP, except it is open-source. Which essentially means it is free to use and you may do what you want with it. The possibilities are endless.
- There are many, many different flavors of Linux, called Distributions. I have always used distro's that fall under the Debian family because they tend to be a little more user friendly and the community seems way more eager to help.
- Linux is way, way, way more secure by nature than any other operating systems. And security updates are always free.
- Linux is super light on your computers resources so even old computers can run like they're new again.
- Yes, Windows programs don't just work right away on Linux. But between the amazing open-source developers who provide free alternative programs and a little something called Wine, nothing will stop you.
- All of your devices such as cameras, cell phones, tablets, printers, keyboards, mice, will all still work. Linux's core system comes with built in open-source drivers that will leave you simply appreciative..
- Yes! You can actually keep your Windows XP installation on the computer, along with Linux Mint and choose between the two whenever you want. You will not lose any of your files, everything stays put.
Linux Mint 13 "Maya" LTS, From Freedom Came Elegance
I truly believe that Linux Mint is by far the best place for a beginner to start with Linux. In fact, it's where I started myself. It can be installed on almost any computer because its system requirements are so minimal and for Windows converts, everything is ridiculously intuitive. So today that is what I will teach you to install.
System Requirements:
Start by heading over to the Linux Mint 13 download page. There you will notice a bunch of different versions of the same distro. That's because there are many different desktop environments for Linux. Those basically change the way the whole distro looks and feels but not how it works. For older computers, I've found that the Mate desktop plays the best with those old graphics cards. I also recommend KDE for computers that can handle a bit of a flashier experience.
System Requirements:
- x86 processor (Linux Mint 64-bit requires a 64-bit processor. Linux Mint 32-bit works on both 32-bit and 64-bit processors).
- 512 MB RAM (1GB recommended for a comfortable usage).
- 5 GB of disk space
- Graphics card capable of 800×600 resolution
- CD/DVD drive or USB port
Start by heading over to the Linux Mint 13 download page. There you will notice a bunch of different versions of the same distro. That's because there are many different desktop environments for Linux. Those basically change the way the whole distro looks and feels but not how it works. For older computers, I've found that the Mate desktop plays the best with those old graphics cards. I also recommend KDE for computers that can handle a bit of a flashier experience.
- So pick which desktop environment you feel appropriate
- Then pick either a 32-bit or 64-bit version, whichever your computer needs. The 32-bit will install on a 64-bit but not the other way around. So make sure you pick correctly.
- Next choose whether you would like codecs to be pre-installed or not. Those are bits of extra software that allow you to watch your favorite video formats or listen to your MP3's. Most people will want these.
- And finally download the version that fits all of your needs from above. I prefer to download by torrent because its a little faster, but if you don't then just choose a mirror from the list. Also, don't be intimidated by downloading from other countries. Remember, Linux is a safe place.
Now is when the fun begins. I will be assuming that most of you are coming from some sort of Windows computer, probably XP because that would simply make sense. And our next task is to take the Linux Mint .iso file we downloaded earlier and put it onto a DVD or a usb flash drive. I will explain both methods.
Because the file is slightly large, you do have to use a DVD. So make sure that you have a working DVD burner and an empty DVD handy. Also, because we're not burning a mix cd of your favorite songs, you cannot simply drag and drop the .iso image to the empty DVD. We have to essentially install the version of Linux Mint to the DVD or usb. Making the live usb is a whole lot easier and way more convenient. So I recommend that method in particular. After make the live image, it can be used to not only install Mint, but it can be used as a bootable operating system that you don't have to install. Awesome right?
Because the file is slightly large, you do have to use a DVD. So make sure that you have a working DVD burner and an empty DVD handy. Also, because we're not burning a mix cd of your favorite songs, you cannot simply drag and drop the .iso image to the empty DVD. We have to essentially install the version of Linux Mint to the DVD or usb. Making the live usb is a whole lot easier and way more convenient. So I recommend that method in particular. After make the live image, it can be used to not only install Mint, but it can be used as a bootable operating system that you don't have to install. Awesome right?
Burn To DVD
To burn the .iso to a DVD, I recommend using the open-sourceInfraRecorder software. I honestly can't remember a time when I didn't use this software for me Windows burning needs.
- So download this file here and install it.
- Insert a blank DVD in the drive and select Do nothing or Cancel if an autorun dialog pops up.
- Open Infra Recorder and click the 'Write Image' button in the main screen.
- Alternatively you can select the 'Actions' menu, then 'Burn image'.
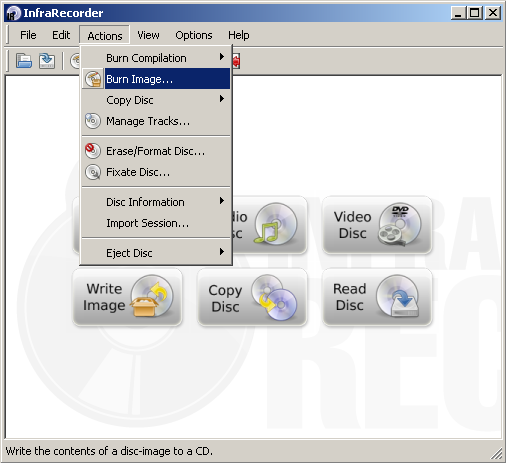
- Select the Mint .iso image file you want to use, then click 'Open'.
- In the dialog, click 'OK'.
Bootable Usb
This really is the easiest and most pleasant way to go about this business. Just think, you can keep your own personal operating system in your pocket wherever you go. You can boot up an entire Linux Mint system in mere minutes whenever you need.
So this is pretty simple:
So this is pretty simple:
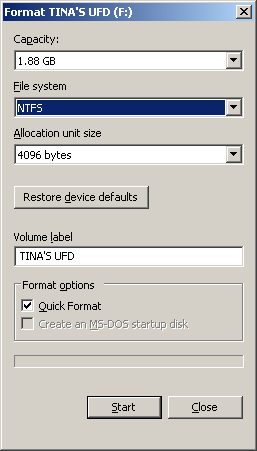
- Make sure you have a couple free gigs of memory on a flash drive that is formated to FAT32. If you're not sure about the format simply go to 'My Computer' - find your flash and right click on it - choose format - under 'file system' choose fat32 and hit start and ok when the dialogue pops up. Now you will lose the data on the usb if you didn't save it or partition the drive earlier.
- Now with your FAT32 flash drive plugged in, open up Unetbootin. It's a pretty simple program with a very straight forward feel. Simply choose the second option on the bottom left called 'diskimage' and select your Linux Mint .iso from the file browser.
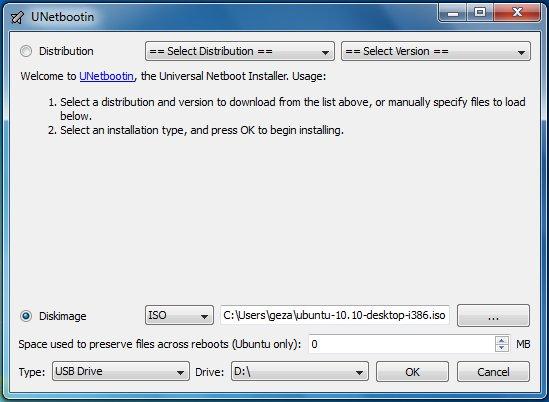
- Make sure the 'type' is USB Drive and the 'Drive' that it is mounted to is correct in the list. Again, you can find what drive the USB is mounted to by going to 'My Computer'.
- Now click 'Ok'.
Now let Unetbootin do its thing until it says 'Installation Complete, Reboot'. Now if you burned a DVD or if you made a live USB, these next steps are the same.
Booting Into DVD/USB
Now we need shut off your computer, so I recommend opening this page on a smartphone, tablet, other computer, or even writing a few steps down by hand. Trust me, you don't want to get stuck in the upcoming steps and have to restart the computer over and over. Been there. Won't do it again.
The first thing we need to do is shut the computer down and boot into your bios. This is sort of a control panel for input and output operations. In this case the bios allows us to skip booting your Windows XP installation and boot directly from the DVD/USB. This is needed because later we're going to be partitioning the computers hard drive and we cannot do that while that same hard drive is mounted or being used. To boot into the bios:
The first thing we need to do is shut the computer down and boot into your bios. This is sort of a control panel for input and output operations. In this case the bios allows us to skip booting your Windows XP installation and boot directly from the DVD/USB. This is needed because later we're going to be partitioning the computers hard drive and we cannot do that while that same hard drive is mounted or being used. To boot into the bios:
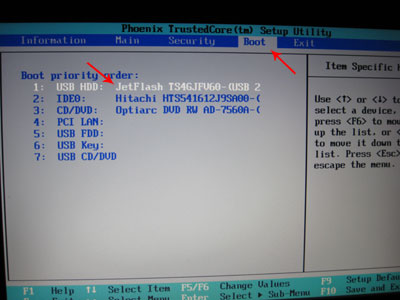
- Power on your computer and wait for that first screen to pop up. Often, it'll say something like "Press F12 to Choose Boot Device" somewhere on the screen. Press that key now. A lot of computers are different so if you can't find it, simply google your computers bios settings.
- Again computers vary, but the boot selection screen we're looking for should look something like the picture below. If you burned a DVD, you choose the CD/DVD option from the list with the arrow keys and hit enter. If you made the live USB, you choose that removable device from the list and hit enter.
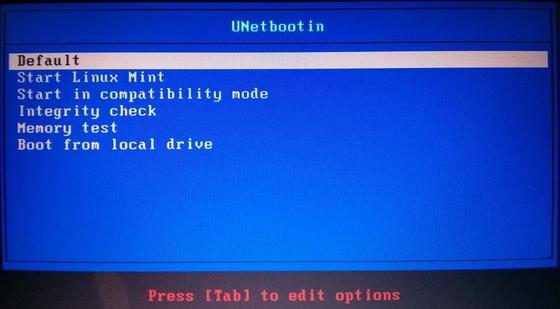
After rebooting a Unetbootin page will appear and you will be able to choose from a few different things but all we need is the default. So either press enter or wait and it will start to boot Linux Mint live. This will take a few minutes depending on the speed of computer. So be patient.
First Glimpse
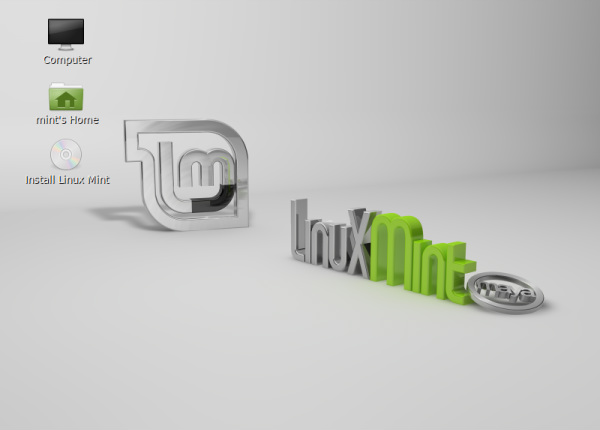
Isn't it pretty? In every way, more elegant and intuitive than XP ever came close to (and in my opinion, any of the Windows versions). This is however, your new system. This is just the live image of it. You can use the software and connect to the internet just like you would on a fully installed system. So after your done playing:
- Click the 'Install Linux Mint' icon from the desktop.
- You'll be asked some simple questions like language and whatnot, so do that. Then stop when you get to the page below
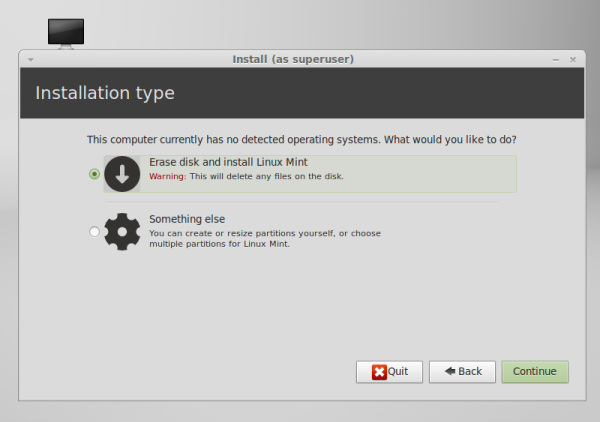
This is where you decide if you want to erase Windows and everything else on your computer OR something else. We need the something else option because this is where we partition your hard drive in order to save Windows and choose between the two operating systems later. Something know as 'dual booting'.
Partitioning
Like I said a few times now, all computers are different. So I cannot just guess as to what everyone's partitioning scheme is. If you're reading this however, you probably have a very simple setup. In the 'Something Else' screen, your hard drive should look a little like this:
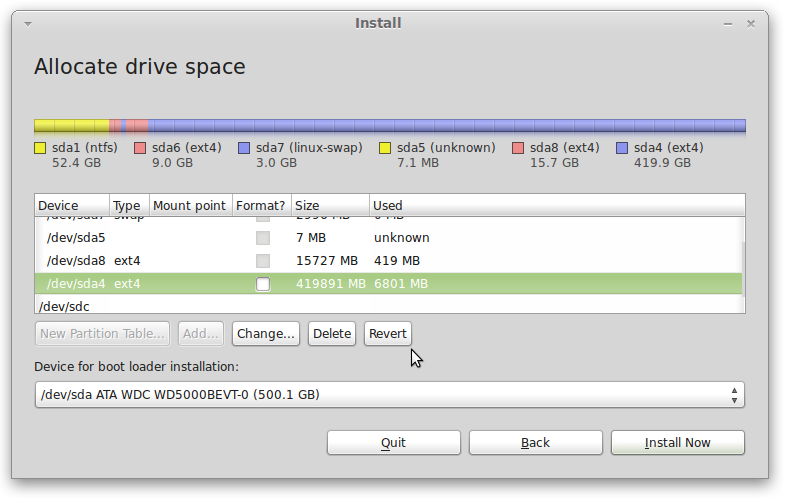
You're should look slightly different that mine. Again, I tinker.
- So in the list of devices, pick the largest portion that says NTFS. This is the partition that XP is on and probably takes up the majority of the drive. Check the box next to NTFS and click 'Change'.There are a few of ways you can define how you want to resize this partition. The easiest way is just to type the number of megabytes you wish to have for Linux Mint in the last input field where it says 'Free Space Following (MiB)'. For 6GB, you would enter 6000 there.The partition editor will not make any changes until you tell it to do so by clicking the 'Apply' button. So for now, click 'Resize' because a few more things to do.
- Next you'll see that the NTFS partition has shrunk and there is a 'free' space behind it. That is where Mint is going to be installed.
- Click the 'free space' then click 'Add' below to create a new partition in the space.
- Make sure 'Primary' is checked
- Type 5000 in the 'New partition' section, leaving at least 1GB for later use.
- 'Use as' Ext4, which is a very sturdy file system that plays well with Linux.
- And under 'Mount point' choose the forward slash, which indicates that this will be your root partition. Root kinda means being the boss of your computer.
- Select 'Ok'
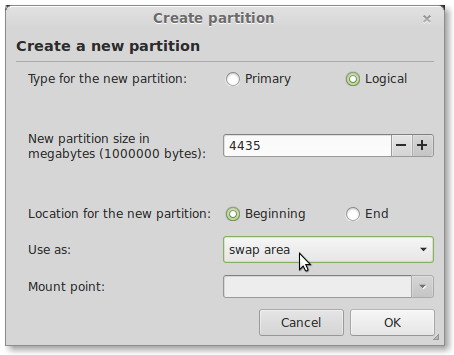
- Choose the remaining free space and bring up the 'Create Partition' screen again.
- Choose 'Logical' on top
- Type at least 1000 in the ' New partition section
- Choose 'swap area' in the 'Use as' section

You can now review the partitions you created before you continue with the installation. Also, you have the option here to select where to install the boot loader. The default is fine if you have no other operating system installed or if you want Linux Mint to ask you at boot time which operating system to boot.
If you want another operating system to ask you at boot time which operating system to boot, then change the device for boot loader installation to your root partition (/dev/sda1 in this example). Note that without additional software, Windows isn't able to ask you which operating system to boot.
If you want another operating system to ask you at boot time which operating system to boot, then change the device for boot loader installation to your root partition (/dev/sda1 in this example). Note that without additional software, Windows isn't able to ask you which operating system to boot.
 RSS Feed